Adelaide Hills Biochar Initiative

MACCY-KON-TIKI CHARCOAL MAKER

by Brian Lewis - December 31st, 2016

Introduction:

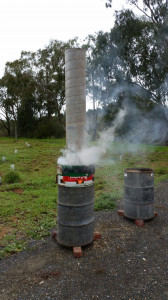
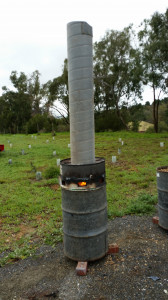
The Kon-Tiki charcoal maker is a relatively new design of charcoal maker currently being adopted widely by the biochar fraternity. It is effectively an above ground open fire pit. The main advantages are simplicity of design, tolerance to shape and size of feedstock, and char volume potentially as large as the container volume itself.

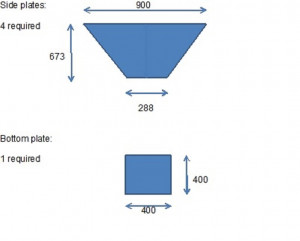
The design of the Kon-Tiki is based on a truncated cone. Alternatively a truncated pyramid can be used. The following plans and parts list are based on the truncated pyramid version. This version has a capacity of 0.230 m³.

Cutouts

Assembly: Position all 4 side plates with 900 edge at ground level and lean in to form a truncated pyramid. Check that each top corner meets flush. Fully weld each side plate to its adjacent side plate. Position bottom plate and fully weld all around to the side plates.

Material thickness:

For economy and lightness a low gauge is desirable; but for durability a larger gauge is preferred. If a light gauge is used, say 1.8mm, then reinforcing rods welded to top and bottom edges would be recommended. These rods can be extended by 100mm at each side to provide lifting means.

For durability and ease of welding 3mm sheet steel is recommended.

Weight:

Based on 3mm sheet steel the approx. weight of the unit will be 35 kg.

Based on 1.8mm sheet steel the approx. weight of the unit will be 21kg.

Rim shield:

In windy conditions it is desirable to use a rim shield. For a truncated pyramid the shield can be made from flat or corrugated sections of used roof or fencing iron placed on all 4 sides. Simply cut to height of unit (600mm) and stand on bricks or similar so that it projects about 100mm above the rim of the unit and about 100mm from edge. This will provide a route for the air to flow up the outside of the unit, be preheated on its way up along the outside and then spill over into the unit to provide an air vortex over and around the top of the flame-front.

Overview

Operation:

Start a small fire in the bottom of the empty unit by constructing a small heap of twigs criss-crossed to form a “chimney” with an air space up the centre. Air will be drawn down to the perimeter of the fire and into the flame area.

Feed larger twigs onto the fire so as to build it up in size.

Continue this process, pausing only if the wood starts to smoke.

Larger pieces can be added as the flame area becomes larger.
What happens is that while the first top layer of wood is burning the layer beneath is heated to the point that it releases its gas which is burnt off cleanly at the top of the wood layer. Air cannot penetrate down below the top layer so no combustion can occur there. Thus the layers are progressively pyrolysed (heated in the absence of oxygen) to produce char.

Continue until the unit is full of char and no more new wood can be added.

Quenching:

When the feedstock has all been converted to char the char itself will then start to burn unless it is thoroughly quenched with water. I recommend that water simply be hosed onto the surface of the char and the unit filled with water. Alternatively the hot char can be tipped out onto a flat non-combustible surface and hosed down thoroughly.

A drain hole in the centre of the base of the unit will allow the water to self-drain when a channel is dug in the ground from the outside to the middle. The drain hole must be air sealed during operation so the unit should be operated while sitting squarely on the ground.

Any questions, comments or helpful suggestions please let me know.

Brian Lewis
Convener
Adelaide Hills Biochar Initiative
www.ahbi-blog.com
www.facebook.com/adelaide-hills-biochar
NEW FLAME CARBONISER GOOD FOR TREE LITTER

by Brian Lewis - December 17th, 2016

A new type of flame carboniser is being developed by the Warm Heart organisation that is shaping up to be an ideal approach for making biochar from tree litter. It does need to be tended (or stoked) to add new layers and prevent smoking
but the trough shape makes it very suitable for longish branches and prunings thereby reducing the need to cut to size as with smaller, drum-type carbonisers.

Go to:

http://warmheartworldwide.org/new-type-fc-biochar-production-unit/

to see an excellent description of the technique and detailed drawings and dimensions of the various models that they have designed.

I have added the above link to the blogroll for your convenience.

TREE LITTER TO BIOCHAR

by Brian Lewis - November 18th, 2016

Now that the EPA has introduced its new air quality regulations the need for a safe and cheap alternative to burning tree litter is imperative. The answer has been staring us in the face for some years. Gasifier type biochar kilns can be used by households and home gardeners to cook their garden waste at high temperatures to make biochar. This can be done with a few minutes of wood smoke during start-up after which the waste emits a clean smoke-free gas flame. The end result is high carbon biochar for use as a soil supplement via the compost heap or by direct application. Biochar kilns need to be approved by Councils as a matter of urgency for use by home gardeners and landholders so that tree litter can be cleaned up progressively before the fire-ban season arrives.

Let’s get the Council wheels in motion on this so that by next year at the latest biochar kilns can be used throughout the Adelaide Hills to help dispose of tree litter in an environmentally friendly way.

I have spoken to the EPA officer responsible for the new air quality policy and it seems that Fire Prevention Officers at the Adelaide Hills Councils simply need to satisfy themselves that the kiln does not emit visible smoke to an extent that would contravene the intent of the new EPA regulations on air quality.

So on that basis the TLUD gasifier kilns and the Kon-Tiki kilns would all satisfy the requirements. Visible smoke and particulate emissions from these types of kilns are virtually zero within a few minutes of start-up. The wood gas emitted by the wood is burned off in a clean gas flame.

So anyone out there that needs to dispose of tree litter please consider making a simple gasifier kiln over the summer months and having it ready for use as soon as the fire-ban season ends.

I’m sure the various Council fire prevention officers would be delighted with any initiative that reduces the fuel load in such an environmentally friendly manner.

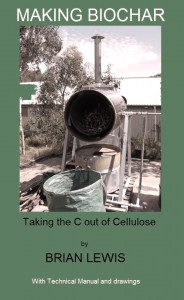
MAKING BIOCHAR – With Technical Manual

by Brian Lewis - November 13th, 2016

Making biochar - with Technical Manual

South Australian on-line publisher Strong & Bold Publishing has released the 2nd edition of “Making Biochar – With Technical Manual” written by ‘Yours Truly’.

This book is based on the experience gained from 5 years of developing and trialling 3 different styles of biochar kilns. It may be unique in that it provides detailed fabrication drawings for building two different types of kiln.
The book provides an excellent introduction to biochar basics and detailed instructions on the operation of a biochar kiln together with a chapter on the economics of making and selling biochar.
The detailed drawings of two types of kiln are provided via the publisher’s website after entering a code obtained from the book. A case study on using a kiln by a commercial winery is included. And a description of a DIY kiln is also included.

The epub version of the book is available to purchase for $9.99 direct from www.strongandbold.com and a Kindle version is available from amazon.com.

This book will be of interest to all biochar enthusiasts, small landowners, horticulturalists and anyone else interested in the improvement of soils by the addition of carbon.

Strong & Bold Publishing specialises in e-publication of Australian writers, old and new.
Further enquiries may be made to:
Strong & Bold Publishing
Email: strongbold@adam.com.au

BIOCHAR FROM MACCLESFIELD

by Brian Lewis - November 13th, 2016

Back when blacksmiths were still in business there were charcoal makers in and around Macclesfield who used the abundant timber resources of the area to make charcoal for the blacksmiths in the town and beyond. A local landmark by the name of Retort Hill is said to be the site of a charcoal making operation back in the 1860’s. (A retort is the technical term for a vessel designed to heat materials in order to purify them or distil other substances from them without actually burning them. So when wood was heated in the retort the moisture, tar and wood gas were driven off leaving behind only charcoal.)

Fast forward 150 years and Macclesfield is now the site of a small but progressive bio-charcoal making enterprise. It is called bio-charcoal or simply biochar these days because the emphasis now is on making charcoal for agricultural use AND to capture carbon rather than burning it as in days of yore.

Greg Marlu established SA Biochar Works near Macclesfield to concentrate on making biochar for use in the garden, either by applying it directly to the soil or by mixing it with compost.

Greg is an active supporter of the Adelaide Hills Biochar Initiative, having demonstrated how to make a gasifier kiln and shared his knowledge of how to operate the kiln safely and effectively at a working bee earlier this year.

I have seen the biochar making process in action at SA Biochar Works and have no hesitation in recommending their biochar for home garden use. I say this because Greg only uses wood waste, only waste from local timber, only uncontaminated timber, takes care not to allow smoke emissions during operation, and crushes the char to a consistent and small particle size amenable to soil application.

For further details on how to purchase biochar from Macclesfield go to: www.sabiocharworks.com.au

Brian Lewis
Convener
Adelaide Hills Biochar Initiative

DIY BIOCHAR KILN – WORKING BEE

by Brian Lewis - September 23rd, 2016

REPORT OF WORKING BEE carried out on 17 June 2016 at Blewitt Springs, South Australia.

PRESENT:
Gareth Carrel: Vigneron
Greg Marlu: Biochar producer
Matt Quinn: Compost producer
Brian Lewis: Biochar blogger

PURPOSE OF WORKING BEE:
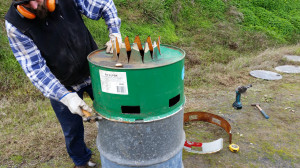
To build 3 biochar production kilns based on Greg Marlu’s adaptation of a top lit updraft gasifier kiln.
This kiln is a simplified version of the Anderson TLUD design in that it does not have an outer drum or top aperture to provide heated secondary air. Greg has found that provided the wood chips are dried before use this design is adequate for making good commercial- quality biochar.

SITE REQUIREMENTS:
A clear flat area about 8m x 8m with no flammable material or overhanging trees.
A water supply.
A supply of dry wood chips.

CLOTHING:
Wool or cotton outer clothes.
Eye protection.
Long fire-proof gloves.

MATERIALS USED (for 3 kilns):
3 x 1 ½ 44 gallon drums, galvanised steel.
3 x 300mm dia. galvanised steel ducting, 1800 mm long.
3 x set of 3 standard house bricks.

TOOLS USED:
Electric drill with 15mm drill bit.
Cutting oil (RP7)
Angle grinder
Hammer
Pitchfork (for wood chip handling)
Propane gas lighter
Mirror on stick (to view underneath main drum)

PROCEDURE to MAKE EACH KILN:
1. TO MAKE MAIN SECTION using one drum:
1.1 Drill 40 holes with 15mm bit in bottom of drum, evenly spaced. Start with 8 mm drill bit.
1.2 Remove top of drum with angle grinder.

2. TO MAKE BURN CHAMBER with adjustable air vent using half a drum:
2.1 Remove a 150 mm high section from open end of half-drum with angle grinder.
2.2 Flare edge of remaining open end of drum so that it fits over the open top of the main drum.
2.3 Cut 3 flaps in edge equi-distant around circumference about 50 mm wide and 20 mm high so
that the resulting flap can be bent inwards to help secure chamber onto top of main drum.
2.4 Take the 150 mm drum section and cut it through at one point so that an open hoop remains.
2.5 Bend back the two ends about 50 mm to form two flanges.
2.6 Drill a matching hole in each flange to suit available piece of fencing wire to hold flanges
together.
2.7 Mark out 6 cut-outs evenly around the hoop, each cut-out to be 100mm wide x 50 mm high.
Tip: Radius of drum is about 1/6 of its circumference.
2.8 Cut out each cut-out with angle grinder.
2.9 Cut a flap out of top side of hoop about ¼ circumference from hoop opening to form a crude
handle.
2.10 Make matching cut-outs in the half drum.
2.11 Fit hoop to the half drum and check alignment of cut-outs.
2.12 Place pipe section on top of half drum in centre and mark a circle around pipe.
2.13 Mark lines from circumference of circle to centre of circle at equal intervals to make 10
sections.
2.14 Drill hole in centre of circle.
2.15 Cut along each line from centre to circumference.
2.16 Bend up each section at right angles to top of half drum.
2.17 Check that pipe section fits securely on top of half drum.

3. ASSEMBLY & OPERATION:
3.1 Locate main drum on 3 bricks to provide air access to holes in bottom of drum.
3.2 Locate half drum with fitted hoop onto top of main drum. This is the burn chamber with adjustable vent.
Note: Adjust the vent holes to about half open for normal operation. Vent only needs to be fully opened during final stage of the process if the char begins to ignite. Increasing the vent opening reduces draft to reduce air flow to any burning char.
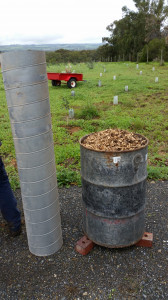
3.3 Fill main drum and burn chamber to top of vent holes with dry wood chips.
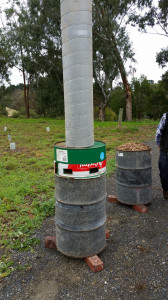
3.4 Fit flue pipe to top of burn chamber.
3.5 Open vent fully.
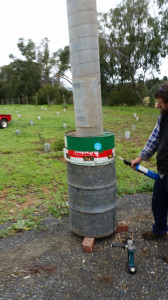
3.6 Use propane lighter to light wood chips accessible through each vent hole.
3.7 Once well alight reduce vent opening to about half-way.
3.8 Observe operation and take precautions to prevent the possibility of accidental contact with hot surfaces (eg. Barrier; Warning signs, etc).
Note: Some smoke will issue from flue during start-up phase while the top layer of wood chips burns. This takes 5- 10 minutes. Then flue emissions should be smoke-free and remain that way until completion.
3.9 Observe discolouration of the external surface of main drum and note area of high temperature.
Note: This high temperature region takes up about 1/3 of the height of the drum and moves slowly down the drum as the woodchips are progressively converted to biochar.
3.10 When the high temperature region reaches the bottom of the drum check for burning char using the “mirror on stick”. If char is burning a red glow will show through the air holes. If there is a red glow open the vent fully to reduce air draft or alternatively block air flow completely. The flame colour is also an indication of char temperature; the flame colour changes towards the blue end of the colour spectrum as it gets hotter (eg. red, orange, yellow, blue).
3.11 Get water supply ready to dowse the char.
3.12 Remove the flue pipe.
3.13 Remove the burn chamber. Check that volatiles have finished burning.
3.14 Tip the main drum over to allow the char to fall out onto a sheet of iron or similar fire proof surface.
3.15 Apply a water spray and thoroughly dowse until all the char is cool to touch.

4. CONCLUSIONS:
4.1 The construction is simple and suitable for most DIY people.
4.2 Not suitable for use in suburban gardens or anywhere where a fire permit is required.
4.3 Operation is simple and is essentially hands-off once started except at completion OR if smoke
emissions occur.
4.4 If wood chips used are too damp the process stalls, smoke emissions occur and the drum needs
to be emptied and contents quenched.
4.5 Wood chips need to be spread and dried before use.

Many thanks to Gareth for providing the site for this working bee and to Greg for sharing his knowledge of kiln-making with us.

Photos:

MAKING THE BURN CHAMBER

MAKING THE BURN CHAMBER

MAKING THE BURN CHAMBER

FITTING THE BURN CHAMBER

FITTING THE BURN CHAMBER

FITTING THE BURN CHAMBER

LOAD THE DRUM

READY TO START

READY TO START

LIGHTING UP

LIGHTING UP

START-UP

START-UP

IN PROGRESS

IN PROGRESS

SUBSTANCE COMBATS GLOBAL WARMING

by Brian Lewis - September 23rd, 2016

The South Australian WEEKENDER HERALD NEWS recently printed an article entitled “SUBSTANCE COMBATS GLOBAL WARMING” featuring a photo of “yours truly” holding some biochar. This excellent article crafted by journalist Lucy Robinson kindly referred to my 5 years of biochar trials while managing local equipment manufacturer Flow Force Technologies; and recommended my new book “Making Biochar – with Technical Manual” for anyone wanting to take up the practice of producing biochar.

The article also referred to my suggestion that local councils get on board and allow landholders the option of using a biochar kiln to convert their tree litter to biochar instead of burning it. The recent extensive storm damage in the Adelaide Hills coupled with new State government legislation banning the burning of garden waste in townships has aggravated the problem of tree litter disposal prior to onset of the bush fire season.

You can read the article on page 2 of the 1 Sept. 2016 issue or use the following link:

http://adelaidehills.realviewtechnologies.com/?iid=145960

and go to page 2.

BIOCHAR UPDATE

by Brian Lewis - September 6th, 2016

Hi out there! Sorry to have been away from the blog for so long. I have been busy developing two new types of biochar kiln. A brief summary follows:

One is a gasifier kiln based on the principles of the “Troika” TLUD (Top Lit Up Draft) gasifier stove developed by Dr. Paul Anderson. I have called this our Series 2 Style.

The other is a retort style kiln that allows the syngas to be used as a fuel for the kiln or diverted to a gas scrubber (i.e. gas cleaner) prior to burning or storing. This is similar in concept to the “Hornito” system developed by Robert Lerner of Biochar Costa Rica. I have called this our Series 3 style kiln.

The Series 3 kiln has been extensively tested and used by Temple Bruer Winery at Milang as part of their on-going program to become carbon neutral in their own right.

After I had done all that I retired so do not have any further commercial interest in making or selling biochar kilns.

However I would still very much like to encourage more people to make biochar.

So with that in mind I have written and published an e-book entitled “Making Biochar – with Technical Manual”. This has been published by Strong and Bold Publishing (my new publishing business) and is available for $9.99 from www.strongandbold.com. Please take a look at it. And if you like it please let me know. Or even tell me how it could be improved. The book is possibly unique in that it includes complete fabrication drawings for the Series 2 and Series 3 style kilns referred to above.

IS ANYONE OUT THERE?

by Brian Lewis - July 26th, 2012

I know there are a few people actually developing and trialling various types of carboniser here in South Australia. But they don’t get much coverage in the media these days. If you are either building, developing, trialling or buying either a batch or continuous carboniser feel free to send your details here with a bit of a story and tell us about it. Don’t hide your light under a bushel!

THE BIOCHAR REVOLUTION

by Brian Lewis - May 14th, 2012

THE BIOCHAR REVOLUTION & COMMUNITY GARDENS


The author of The Biochar Revolution, Dr. Paul Taylor recently contacted me to discuss the Flow Force Technologies biochar kiln that we have been testing in the Adelaide Hills. He is interested in possibly using it in his community garden projects in northern NSW.

He is currently using an Adam retort but believes there may be scope for a number of different styles of kiln depending on the type of feedstock, the type of user and the ultimate purpose of the biochar.

I believe the Flow Force biochar kiln is well-suited to community garden use. It is mobile and simple to use. It is relatively fast in operation (typically 4 hours per batch compared to 24 hours for some other systems). It is easy to load and unload by virtue of the revolving loading/unloading hatch.  It provides an electronic record of kiln temperature so the maximum temperature and duration of pyrolysis can be confirmed for each batch. It uses a built-in solar panel to operate the electronics so does not require an external supply of electricity.  

NOTE:

Chapter 1 of Paul Taylor’s book is available for free download at http://www.biochar-books.com/TBRDetails or from the website http://biochar-books.com. And the foreword by Dr. Tim Flannery is well worth reading and inspiring in itself.